Tuesday 10 December 2013

CDDA - Evaluation

Overall I feel that I did well in this module. I had to create a 2D digital character design model and facial expression sheet, a 2D digital environment and a 2D digital prop model sheet. The learning outcomes of the module were to demonstrate and understand the connection between the traditional and digital artwork, apply appropriate techniques and process in the development of a character, prop and environment concept and to critically evaluate new concepts and evidence from a range of sources. Again I think that I did well on all these points.

This module showed me how artists might start work on a game, working from the initial concepts up to finished designs which are ready to be turned into 3D art. From the initial concepts I had to develop colour schemes, outfits and feel for the characters and the world they would interact with. I had to make the design complete from all angles so it would be ready to be made into a 3D model. One important thing stressed in the brief is about translating work from a traditional medium to a digital medium as this enables artists to manipulate the art and use it to its full effect.

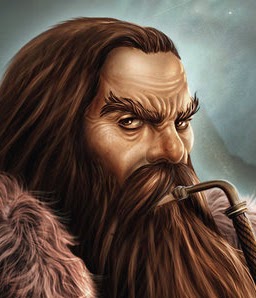
My initial design was simply of a Dwarf that was not any kind of fighter. From this I built up a character history about him which helped me develop him on paper and in my head. From this I got the idea of what kind of Dwarf he would be, what he would do for a living and how he reacts to the world. Following this I began to refine my initial idea, changing the outfit to be appropriate to his character and life, start developing what his face would look like and move him towards what he would finally look like.

I also began designing his prop and environment after doing some more work on the character himself. The prop, a cross between a pickaxe and a war hammer, reflected his job as a blacksmith and environment of a cave. I started this by making lots of initial designs and then using thumbnail images to quickly develop them further. The initial environment was defined a lot by the character history and it was only really what filled the environment left to design. Again I turned to his job as a Blacksmith to help here, filling it with anvils and taking real world machines and turning them into a slightly more fantastical version of themselves. I made a photo manipulation of one of my initial ideas to help give me an idea of what that environment would look like.

With a solid idea of my Dwarf and world in mind, I began to finalise my designs. I looked at artists such as Bao Pham and Mathias Kollros to learn more of colours and textures. I experimented with colour schemes and defined his final costume. I created my turnaround board of my character to give me the full likeness of him. I found textures which would be present on the character and in his world, giving the work a much more lifelike look. And finally I looked at all the design work and created the final beauty shots, showcasing the design in its best light and trying to get across everything of the Dwarf and his world in a few images. Frank Franzetta’s work was incredibly helpful regarding composition.

Despite being happy with my end product, there are many things I would change if I was to do a similar project again. At the start of the project I was very slow at work and tried to make the majority of my pictures look as good as possible, taking up lots of time. I would be more confident in my work and less afraid of making a design that I would not use. I found that the initial stages of a project should consist of lots of rough, quick designs which can then be evaluated for their potential. Also, I would like to have created more initial designs for the environment specifically as I changed its design partway through the project after spending some time developing another idea which resulted in wasted time.

I would balance my time more fairly between all aspects of the project depending on the workload. In this project I spent a lot of time working on my prop and character whilst not doing a whole lot of work on my environment. I should have spent much less time on my prop and more on my environment, as a prop doesn’t take too long to design from initial idea to finished product if you have a well-defined environment and character, whilst an environment will take a while to complete regardless of how much work you have done. It is simply a bigger idea to show in your artwork. This could also have helped with the quality of the work as I would not have felt rushed to finish my beauty shots at the end if I had spent less time developing the designs and had more time to make them look their best.

I would have liked to spend more of my initial time experimenting with different styles and mediums. In this project I kept to mediums such as pencils that I felt were ‘safe’ and used a realistic style as it was the style I am most comfortable with. Even if I did end up using that style in my finished product it would have been nice to try more styles, one could have created an interesting idea to use in my project or could have looked much more interesting to the eye.

I learnt many skills and techniques during the length of this module that will help me with much of my work in my future industry. Possibly the most important is confidence in my work. At the beginning of the project I considered myself a bad artist and was rarely happy with my work. Now at the end of the module I feel really proud of my final beauty shots and can appreciate what is good and bad in the works.

Leading on from my past point, I have learnt a lot about analysing work. During the initial stages of work I became better at picking out any positives and negatives with each design, helping develop my final design using the positive points and avoiding the negatives. Not only does this apply to my work, but other artists too. This got me researching into artists’ work and seeing what makes their art so good. I’ve started using websites such as DeviantART and reading art magazines and concept art books more regularly since the start of this project and that has really helped me find what makes a piece of art work.

I learnt a lot about perspective and composition in this module. I did have a basic understanding of perspective at the start of the semester but I wouldn’t have had the confidence or skills to produce an image which was all in the correct perspective. My final beauty shots all feature some kind of perspective and that can really make artwork look ‘right’ to the eye. As for composition, I learned about the rule of three and how art can be divided into 3 areas. My environment can roughly fit the rule though it doesn’t fit perfectly with it. Frank Franzetta’s work taught me about composition in my work and, whilst not really being used in this project, how to attract the eye and make a focal point in an image.

Colour theory is something I had next to no knowledge about. I now understand the difference between complementary and analogous colour schemes and I understand how these different types of colours work together and to what affect. Learning about how to use contrasting colours and lighting to create interest really helped me when creating my environment and was a key point I considered whilst coming up with the design. Bao Pham’s work was very inspiring, featuring a mixture of colour schemes and how they apply to not just characters and environments but mixing between them.

One of the most useful things I have learnt is how to use many more of the different tools and methods in Photoshop to create digital art and make it look great. From more simple tools like the Pen tool to the different blend modes in the Layer system, all of these have helped me create my final work and make them look as good as they do. There are still countless things I don’t know about Photoshop but I have learnt most of the basic tools and filters used to create digital artwork and photo manipulations. Using photos as an overlay on my work showed one of the biggest improvements to my work, really pushing the realism on the objects. Mathias Kollros has some great textures in his work which I love; these were very inspiring to look at it.


Overall I’m very happy with my work on the project and feel that if I were to do something of a similar sort of nature then I would have a better and more efficient work pipeline that would end with me creating even better art work.

CDDA - Final artwork - Face update

This is my final bit of artwork for this module! I changed the lower right face. It is still a neutral face but looks a little more like my character. The faces aren't perfect but I'm happy with them, being my worst area of work normally. I shall be posting an evaluation of the module shortly. 


CDDA - Prop turnaround board

So this is my finished turnaround board. I'm pretty happy with it though I plan to darken the hammer on the back image (middle) as it isn't distinguishable from the pick axe. Anyway I'm happy with how it turned out and think it would a be very useful piece of artwork for anyone trying to develop the idea from 2D to 3D.


Here's the updated version. Not much of a change but enough so that the the pick axe and hammer are noticeably different shades.


CDDA - Prop turnaround progress

So this morning I've been working on a turnaround board of my prop showing the side, back and front views of it. I'm doing this as I realized that I didn't have any neat turnaround board for the prop. Also it doesn't take too long so  have time to do it. I plan to add colour to at least the side view and then see how time is going. After I have finished this work I would like to redo a few of the faces on my facial expression board. 


Monday 9 December 2013

CDDA - Environment beauty shot changes and reference/overlays

Just a few quick changes to my environment, them being the light from the door being dimmed a lot and the red glow from the ruby lettering being a bit smaller. I'm also uploading textures that I used for overlays on this piece of art. Apart from these I used textures also used on my prop, something I used for inspiration when it came to colours. 


CDDA - Environment beauty shot

I finished my environment beauty shot today. Considering the speed I did it in I'm very happy with it. The pillars looks great and I'm very glad I added the indents and extrusions into/out of them as it makes the scene much more interesting and breaks up the scene a bit. The door came out quite well, I think that I may lower the lighting on the sphere but am pretty happy with the majority of it. My least favourite point of the piece is the fire and that is because I don't have time to draw my own as that would undoubtedly take a long time. But overall I'm very pleased with it. 


Sunday 8 December 2013

CDDA - Environment no linework

What it says really, just removed the line work and filled in gaps and got everything neat and tidy for textures and shading. So far the environment looks quite good yet simple enough that I shouldn't struggle with it too much hopefully. 


CDDA - Environment base colours

This morning I have completed my base colours for my environment scene. It's pretty simple. I worked alongside my character and prop beauty shots as I want the colours to be similar in a sense as I feel that the Dwarfs would be a very united people and such use a similar colour palette. The pillars are made with a kind of iron/stone hybrid (my prop hammer and pickaxe material), the torch is silver (prop handle) but the shadow has made it look too dark, the gate is gold (prop decoration) and the lettering ruby (as is the writing on my prop). The floor is a kind of light stone, similar to a sand colour, whilst the main path is iron which I plan to have some kind of engraving on. The path has occasional red rugs and the gold diamonds will likely be a similar design to them. Below you can see in order, base colours with base shadow, base colours with both base light and shadow, a pattern I may apply to the iron path and then possible rug patterns. I will next get rid of my linework and then find textures for all the materials (though I may use the same as in my prop). Once that's done I will update on here again. It should be done today and then I plan to try and start neatening up the shadows in the scene first before adding the lit areas and highlights. 


Saturday 7 December 2013

CDDA - Environment lighting

Here is the base light/shadow on my line drawing of my environment. I quite like it as I get a large range of colours with a few contrasting areas which adds to the attraction of the image. I decided to give the door a glow as it looked very bland with just the torch. Tomorrow I move onto base colours, textures and a start on the shading. 


CDDA - Final environment linework

So this is my base line work for my environment. I kept it very similar to my mock up just changing and adding some details. The marks going into the pillars are mainly to break up the environment lighting a little, it could become very bland otherwise. My next step is to block out some shading. I think that I may have not put enough light sources in the scene (the torch will be lit in the final shot and there is one on the other side of the hall) so I may add torches towards the door too or maybe have the circles emanate a slight light source, it is a fantasy world after all. 


CDDA - Final environment mock

This is the mock up for my final environment. I went for a design similar to my very first but neatened up. I plan to add more torches on either side and have all the spacing done correctly but this is a very basic version of it. Whether I'll be happy with the final image I don't know but I feel that the geometry here is simple enough that I can finish it to a passable level at least. 


CDDA - Environment further development

Following my post earlier regarding my environment design I went away and created this. Whilst I like symmetrical theme kind of thing I don't think it looks very good. In order to have the idea work I would have to place the pillars out wider to make the tunnel wider but the I don't think that would work in this kind of setup. I'm going to go away and try to make some kind of idea that works from what I have. I may end up creating something more similar to my original design or may do something similar to this but more to my liking, I shall see.


CDDA - Envrionment development

Today I started work towards the completion of my final piece of work needed for my module, my environment beauty shot. Environments are something I have little experience in drawing and creating so I have struggled a bit. I decided to choose a reasonably simplistic idea that I originally had as I did not want to be too ambitious with my design, better to have a simple, well created piece of art than a great idea that is executed poorly. It is essentially a tunnel with a series of pillars on either side. To this original design I have added a back door to it. I also plan to add torches to line the halls. I'm planning to have my vanishing point more central to the image and slightly lower than on my digital version. I also plan to add some small decorations to the image too yet I don't really know what would fit at the moment, the only idea I have is some kind of weapon plaques showcasing the Dwarfs blacksmiths skills. Anyway the environment is developing albeit slowly. 


Friday 6 December 2013

CDDA - Character reference photos

Just a few images I used for my character beauty shot and facial expression shots. 


CDDA - Facial expression board

Today I finished my characters facial expression board. I did happy, suspicious, laughing, angry and neutral. I'm not hugely happy with the suspicious face or the neutral but I'm pretty pleased with the other 3. Considering that faces are my least confident area of human anatomy I think I did okay. If I finish my environment beauty shot early then I will most likely come back to this and redo those two faces as I feel they are the worst work I have done for my final hand in and I'm not completely happy with them. 


Thursday 5 December 2013

CDDA - Life drawing - Woman model

This week at life drawing we had a female model making it a much more interesting session with the different shapes and shadows to be drawn. We started with 5 minute poses which went okay, it was quite a lot different from drawing our normal male model. The main difference that I struggled with was the size of the model, a slim build, which was very different to our other model.


We then did a 25 minute drawing. This one went quite well, I like it from the hips up. The legs are too thin and bend slightly. I also decided to use orange for highlights and my charcoal for the shadow giving a nice effect. I was pretty happy with this.


Lastly we did a 45 minute drawing. I used the same medium again. It went pretty well, I was really happy with the shapes and I felt I got the general idea of the shadows and highlights on her. I drew her face which I was pretty happy with too though I didn't have time to add colour and shadow. 


CDDA - Character Beauty Shot

Today I finished my character beauty shot. I'm pretty happy with how it came out, especially the face. I've always found faces to be something very difficult to draw so drawing one with lighting from below was very difficult for me yet I managed well. One thing I would have liked to do better was push the contrast more, particularly the light areas. Whilst I tried this, I do not have long before my deadline so I don't have time to be doing 'perfect' pictures, yet I tried hard and took my time on this. 


Tuesday 3 December 2013

CDDA - Character beauty shot update

Just an update on the character beauty shot. I've finalized and tweaked my pose and got the base colours down now. I plan to shade the character and then do the background after the foreground is finished. I'm going to start with the face as I find this to be the most difficult area to draw and would like to get it out of the way first. 


CDDA - Turnaround Colour

This week I finished off the colour on my front view for my turnaround board. I've been informed that this is the only view which I need to do on this piece of work. I would have like to have done the others but deadlines are looming and I still have more work to do for next week. Overall I'm happy with how he came out except for his nose, I would have liked to make this a little wider and fatter. Apart from that I'm very happy with it. 


Intro to 3D - Final Render

Today I finished the last part of my vending machine and rendered it in Marmoset. I'm very happy with how it turned out and felt that I learnt a lot from this project.